
How to Measure Windows for Replacement: Step-by-Step Guide
Why Getting Your Window Measurements Right Is the Most Important Step You Will Take
Before you choose a style, pick a color, or request a single quote, there is one task that determines whether your entire window replacement project succeeds or fails. That task is measurement. The correct dimensions, taken the correct way, are what separate a perfectly fitting replacement window from one that arrives at your door and simply does not fit the opening it was made for.
This is not a minor issue. Custom-manufactured replacement windows cannot be returned. A measurement error that results in a wrong-size order means waiting weeks for a reorder, paying restocking or remanufacturing costs, and leaving your existing windows in place longer than planned. According to window installation professionals, even a 1/8 to 1/4 inch discrepancy can be the difference between a clean, properly sealed installation and visible gaps, forced modifications, or an outright rejected unit.
Here is the reality of the window replacement market in 2026: the average project costs between $232 and $740 per window, with most homeowners spending around $477 per window according to a November 2025 survey of 1,000 homeowners by This Old House. For a typical home with 10 windows, that is a $4,700 to $7,400 investment. Protecting that investment starts with a steel tape measure and five minutes per window.
This guide is built from the same process that Raleigh Window Company uses on every professional measurement visit. Whether you are gathering preliminary information before requesting a quote or want to understand what a certified installer will do when they arrive, this is the complete, accurate framework for measuring replacement windows in 2026.
Before You Begin: Key Facts About Window Replacement in 2026
| Data Point | Source and Finding |
| Average cost per replacement window in 2026 | $477 per window, with a typical range of $232 to $740 (This Old House, November 2025 survey of 1,000 homeowners) |
| Average full-house window replacement cost | $7,354 per project, with most homeowners spending $3,440 to $11,840 total (Angi, 2026) |
| Measurement tolerance for custom replacement windows | Dimensions must be accurate within 1/16 inch for impact-resistant and custom-shaped units; 1/4 inch tolerance for standard units |
| Minimum window depth required for replacement fit | At least 3 and 1/4 inches of depth between the inside trim and the outside blind stop strip (This Old House, 2026) |
| Cost of water damage from faulty installation | $2,000 to $10,000 or more; most manufacturers void warranties for improperly installed windows (Taylors Windows, 2026) |
| Energy savings from replacing single-pane windows | $125 to $340 per year with ENERGY STAR certified replacements (U.S. Department of Energy) |
| Homeowners saving on energy bills after replacement | Over 66% of homeowners report saving $25 to $100 per month on utility bills after installing new windows (This Old House, November 2025) |
| ROI for vinyl window replacement at resale | Homeowners recover up to 76% of replacement cost at home sale (Journal of Light Construction Cost vs. Value Report, 2025) |
What You Need Before You Start Measuring
Measuring windows for replacement is a straightforward process, but it requires the right tools and an organized approach. Using an incorrect tool or skipping a measurement point creates errors that compound downstream. Gather everything before you begin so you are not hunting for materials mid-measurement.
Required Tools
- Steel tape measure, at least 25 feet long. A steel tape holds its shape when extended across a window opening, unlike fabric or soft tapes that bow and introduce reading errors. This is the single most important tool in the process.
- Notepad and pencil, or a phone with a note-taking app. You will record three width measurements, three height measurements, and one depth measurement for each window. Labeling these clearly by room and window position prevents confusion when ordering.
- A level, for checking whether the window frame is plumb and level. This helps identify settled or out-of-square openings before ordering.
- A camera or phone for photos. Photographing each window and its opening before you measure creates a visual reference that is especially useful when discussing measurements with a window company.
- A helper for large windows. Windows with wide spans benefit from a second person holding the opposite end of the tape measure for accurate readings.
PRO TIP: Always use a steel tape measure, never a fabric sewing tape or a soft retractable measure. A 36-inch window opening measured with a soft tape can read up to 1/4 inch shorter than its true dimension when the tape sags in the middle. That error alone can make a correctly sized window too small to fit properly.
Understanding Window Parts Before You Measure
Accurate measurement requires knowing which parts of the window you are measuring to and from. Using the wrong reference points is one of the most common causes of measurement errors. Here are the key terms that appear throughout this guide.
| Window Part | What It Is and Why It Matters for Measurement |
| Jamb | The vertical sides of the window frame. Width measurements run between the inside faces of the left and right jambs. |
| Head Jamb | The horizontal piece at the top of the frame. Height measurements run from the top of the sill up to the bottom face of the head jamb. |
| Sill | The horizontal bottom piece of the window frame. This is where height measurements terminate at the bottom. |
| Rough Opening | The structural opening in the wall framing that the window sits in. For insert replacements, you measure the existing frame opening, not the rough opening. |
| Sash | The movable part of the window that holds the glass. The sash slides or swings depending on the window type. |
| Blind Stop | The narrow strip on the exterior side of the frame. Depth is measured between the inside trim and the outside blind stop. |
The Complete Step-by-Step Window Measurement Process
Work through these steps in order for every window in your home. Never assume two windows of the same apparent size have identical dimensions. Even windows installed side by side in the same wall can differ by 1/8 inch or more due to settling, framing variations, or original construction differences. Measure each one as a separate unit.
STEP 1: DETERMINE WHETHER YOUR PROJECT IS AN INSERT REPLACEMENT OR FULL-FRAME REPLACEMENT
Before measuring, identify which type of replacement you are ordering. An insert replacement (also called a pocket replacement) involves removing only the existing sash and leaving the current frame in place. The new window is manufactured to fit inside the existing frame opening. A full-frame replacement removes the entire window including the frame, sill, and casing down to the rough opening, then installs a completely new unit. Insert replacements are the most common approach for well-maintained frames. Full-frame replacements are needed when the existing frame is rotted, severely out of square, or when changing the window style significantly. For insert replacements, measure the existing frame opening from jamb to jamb and from head jamb to sill, measuring inside the frame. For full-frame replacements, measure the rough opening in the wall framing. This guide focuses primarily on insert replacement measurement, as it applies to the majority of residential projects.
STEP 2: CHECK THE OPENING FOR SQUARE
Before taking your working measurements, verify whether the window opening is square. An opening is square when all four corners meet at 90-degree angles. Out-of-square openings are common in homes more than 15 to 20 years old due to settling and framing shifts. To check squareness, measure diagonally from the top left corner to the bottom right corner of the frame opening. Then measure diagonally from the top right corner to the bottom left corner. Record both measurements. If the two diagonal measurements are within 1/4 inch of each other, the opening is acceptably square for a standard replacement window. If the difference exceeds 1/4 inch, the opening is out of square and you will need to discuss this with your window installer before ordering. Severely out-of-square openings may require shimming, framing adjustments, or a custom-sized unit.
PRO TIP: In homes built before 1980, out-of-square openings are more common than square ones. If you are measuring an older home in Raleigh or the surrounding Triangle area and most openings show diagonal differences greater than 1/4 inch, note this on your measurement sheet and raise it during your professional consultation. Raleigh Window Company checks every opening for squareness during our free in-home measurement visits.
STEP 3: MEASURE THE WIDTH AT THREE POINTS
Width measurement is the most critical dimension in your order. Measure the width of the window opening at three positions: the top of the opening (just below the head jamb), the middle of the opening, and the bottom of the opening (just above the sill). For each measurement, place your tape measure between the inner faces of the left and right jambs. Do not measure to the exterior trim, the blind stop, or the outside casing. You are measuring the inside of the existing frame. Record all three measurements to the nearest 1/8 inch. Do not round up. After recording three measurements, identify the smallest of the three. This is your working width. Ordering from the smallest measurement ensures the window will fit within the narrowest point of the opening. The installer will use shims and foam to seal any gap where the opening is slightly wider than the window unit.
CRITICAL WARNING: Never measure only one side or take a single center measurement and assume it represents the entire width. Windows Pros and multiple installation companies report that measuring from only one point is among the most common and most costly measurement errors in DIY window projects. Out-of-square openings guarantee that a single-point measurement will produce an inaccurate result.
STEP 4: MEASURE THE HEIGHT AT THREE POINTS
Height measurement follows the same three-point approach as width. Measure the height of the opening at three positions: the left side, the center, and the right side of the opening. For each measurement, place the tape measure from the highest point of the sill to the bottom face of the head jamb. Important note on sill slope: many window sills are sloped slightly toward the exterior to allow water drainage. Do not measure along the slope. Measure vertically from the flat interior sill surface to the head jamb. Record all three height measurements to the nearest 1/8 inch. Do not round up. Identify the smallest of the three. This is your working height. Using the smallest height measurement ensures the unit fits the most constrained point in the opening.
PRO TIP FROM RALEIGH WINDOW COMPANY: If your sill is noticeably sloped, use a thin piece of cardboard or a level to create a horizontal reference surface at the sill before measuring vertically. Measuring along a sloped sill surface adds false height to your reading and can result in a unit that is too tall to seat properly in the opening.
STEP 5: MEASURE THE DEPTH OF THE WINDOW OPENING
Depth is the measurement that most DIY guides mention briefly but that installers identify as one of the most frequently missed dimensions. The depth of your window opening determines whether a standard replacement window unit can physically fit in the frame from front to back. Measure the depth at the top of the opening by placing your tape measure from the interior face of the inside stop (the narrow strip that holds the sash in place) to the exterior face of the blind stop on the outside of the frame. For a standard insert replacement window to fit properly, this depth measurement must be at least 3 and 1/4 inches, according to This Old House measurement guidelines for 2026. If your depth measures less than 3 and 1/4 inches, a standard replacement insert will not physically seat in the opening. This typically indicates that the window may require a narrower-profile product or a full-frame replacement approach. Note this measurement on your worksheet and flag it when speaking with your window company in Raleigh NC.
STEP 6: RECORD, LABEL, AND PHOTOGRAPH EVERY WINDOW
After completing width, height, and depth measurements for each window, record all three values immediately on your worksheet before moving to the next window. Label each entry clearly by location, for example: Kitchen South Window, Master Bedroom Left Window, Living Room Bay Left Panel. Do not rely on memory to assign measurements to window positions later. Photograph each window from the interior immediately after measuring. The photo should clearly show the opening, the sill, the trim condition, and any visible damage or irregularities. This documentation serves two purposes: it gives you a visual cross-check when reviewing your measurements later, and it provides your window company with context about the opening conditions before the professional measurement visit.
Measuring Different Window Types: What Changes by Style
The three-point width, three-point height, and depth protocol applies to all window types. However, certain styles have additional considerations that affect how measurements are used in the ordering process.

Double-Hung Windows
Double-hung windows, the most common residential style, use the standard three-point width and three-point height measurement protocol described above. One additional check specific to double-hung windows: confirm whether the existing frame uses a pulley system for sash weights. Older homes in the Raleigh area may still have original double-hung windows with cast iron sash weights inside the jamb cavities. When measuring depth on these windows, note the presence of the pulley hardware. Your installer will remove the sash weight system during the insert replacement process, but the presence of a weight pocket can affect which replacement profiles will seat correctly in the opening.
Casement Windows
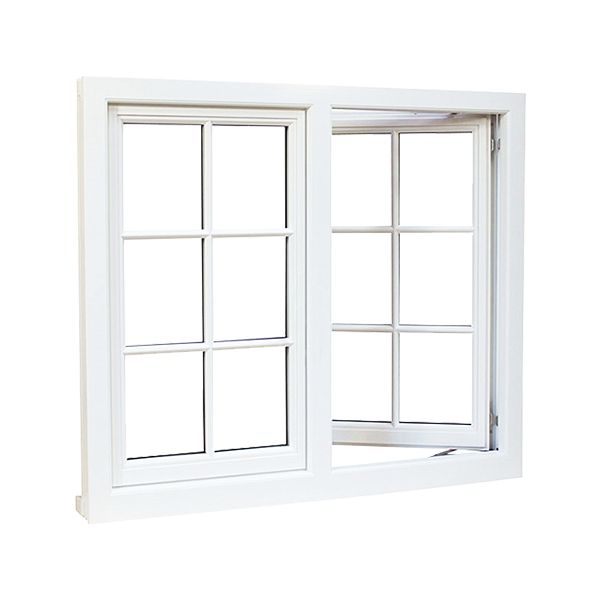
Casement windows hinge on the side and swing outward. Measure width and height using the same three-point method, measuring between the inside faces of the jambs and from sill to head jamb. For casement windows, also note which side the hinge is on, left-hand or right-hand operation, and which direction the window swings when open. This information is required when ordering to ensure the hardware and sash operation match your existing configuration.
Sliding Windows

Sliding windows open horizontally. Apply the same three-point width and height measurements. For sliding windows, note the direction each sash panel slides, as some configurations have the operable panel on the left and some on the right. Record this on your measurement worksheet.
Bay and Bow Windows

Bay windows consist of three or more panels arranged at angles, while bow windows use four or more panels in a gentle curve. These configurations require measuring each individual panel within the bay or bow as a separate opening, using the three-point width and height protocol for each. Additionally, measure the projection depth of the bay from the main wall surface, the total width of the bay from outside trim edge to outside trim edge, and the center panel angle. Bay and bow window measurement is more complex than single-unit windows and is one of the configurations where Raleigh Window Company most strongly recommends a professional measurement visit before ordering.
Specialty and Shaped Windows
Arched windows, circle windows, half-round windows, and other specialty shapes require measurement of the rectangular portion at the base as well as the radius of the arch or the diameter of the circle or half-round. These measurements must be precise to the nearest 1/8 inch. Specialty window measurement is another case where most window manufacturers strongly recommend a professional verification visit before any order is placed.
The Eight Most Common Window Measurement Mistakes and How to Avoid Them
- Measuring the glass pane instead of the frame opening. The glass is smaller than the frame opening by the width of the sash and frame components. Always measure the opening from jamb to jamb and from sill to head jamb, not the glass surface.
- Taking only one measurement per dimension. Openings are almost never perfectly uniform across their full span. A single center measurement misses the narrowest point, which is the dimension that determines fit.
- Rounding up instead of down. Always use the smallest of your three measurements and record to the nearest 1/8 inch. Never round up to the next convenient number. A window that is even 1/8 inch too wide will not seat in the opening.
- Forgetting to measure depth. The 3 and 1/4 inch minimum depth requirement for standard insert replacements is frequently overlooked by homeowners. A unit that is perfectly sized in width and height will still fail to install correctly if the opening is too shallow.
- Ignoring sill slope when measuring height. Placing the tape along a sloped sill rather than measuring true vertical height adds false dimension to the reading.
- Measuring from the exterior. Replacement windows are measured from the interior of the home, measuring between the inside faces of the frame components. Exterior measurements include casing and trim that are not part of the opening dimension.
- Assuming identical windows have identical dimensions. Every window opening must be measured individually. Settling, framing variations, and construction tolerances mean that two adjacent windows of the same apparent size can have different actual dimensions.
- Not documenting measurements by location. Recording measurements without labeling them by room and position creates confusion during ordering, especially in homes with many windows of similar sizes.
When to Stop Measuring and Call a Professional
Measuring your own windows is a reasonable first step for gathering planning information and understanding the scope of your project. However, there are specific situations where professional measurement is not just recommended but essential for a successful outcome.
- Your home was built before 1980 and most openings show diagonal measurements that differ by more than 1/4 inch, indicating significant settling and out-of-square conditions throughout the structure.
- Any window opening has a depth measurement below 3 and 1/4 inches, suggesting that the opening may not accommodate a standard insert replacement without frame modification.
- You are replacing bay or bow windows, arched windows, round windows, or any other specialty shape where the geometry requires radius or angle measurements beyond width and height.
- Water damage or frame rot is visible around the opening, indicating that the existing frame may not be structurally sound for an insert replacement.
- You are replacing more than five windows and the investment warrants a verified professional measurement to protect against ordering errors on multiple units.
- Your home is in an HOA community or a historic district that requires documentation of window dimensions and specifications for approval.
Raleigh Window Company offers free in-home professional measurement visits as a standard part of our quote process. Our certified specialists bring calibrated tools, verify squareness on every opening, check depth, document conditions, and provide a complete measurement record that becomes the basis of your order. There is no charge for this service and no obligation to purchase. Contact Raleigh Window Company today to schedule your free measurement visit from the Window Services Near You that Raleigh homeowners rely on.
How to Record and Organize Your Window Measurements
A measurement sheet that is clearly organized prevents ordering errors and makes it easy to communicate with your window company. Here is the recommended format for recording your measurements.
| Window Location | Width (Top / Mid / Bot) | Working Width | Height (L / C / R) | Working Height | Depth |
| Ex: Kitchen South | 35.5 / 35.25 / 35.5 | 35.25 in. | 47.75 / 47.5 / 47.75 | 47.5 in. | 3.5 in. |
Frequently Asked Questions About Measuring Windows for Replacement
Should I measure windows from the inside or outside of my home?
Replacement windows are always measured from the inside of the home. Measuring from the exterior introduces the exterior casing and trim dimensions into your reading, which are not part of the window opening you are ordering to fit. Position yourself inside the room and measure between the interior faces of the left and right jambs for width, and from the top of the sill to the bottom of the head jamb for height. The only partial exception is for full-frame replacement projects, where you may need to measure the rough opening in the wall framing, but even then a professional installer should verify those dimensions. Raleigh Window Company measures every opening from the interior as part of our standard free in-home measurement process, so if you have any doubt about your measurement reference points, schedule a free visit and we will handle it correctly from the start.
What is the minimum depth my window opening needs to be for a replacement window?
The standard minimum depth for a replacement insert window is 3 and 1/4 inches, measured from the interior face of the inside stop to the exterior face of the blind stop. This 3 and 1/4 inch space is required to physically accommodate the depth of the replacement window unit and allow it to seat properly in the frame. If your opening measures less than 3 and 1/4 inches, a standard insert replacement may not physically fit without modification. Options in this situation include a narrower-profile replacement unit from a manufacturer that offers reduced-depth products, or a full-frame replacement that removes and rebuilds the entire frame assembly. Check your depth on every window before ordering, not just one representative opening. Depth can vary between windows even in the same home, particularly in older Raleigh area homes where different generations of window installation have occurred in different rooms.
How do I know if my window opening is square enough for a standard replacement?
Check squareness by measuring diagonally from corner to corner of the window opening in both directions. Measure from the top left corner to the bottom right corner, and then from the top right corner to the bottom left corner. If the two diagonal measurements are within 1/4 inch of each other, the opening is acceptably square for a standard replacement window. A difference greater than 1/4 inch indicates an out-of-square opening that will require shimming, framing adjustment, or potentially a custom-sized unit. Out-of-square openings are very common in older homes throughout the Raleigh area, particularly in houses built before 1970 where settling, foundation movement, and decades of temperature cycling have shifted wall framing from its original position. Raleigh Window Company identifies and documents out-of-square conditions on every professional measurement visit and recommends the correct approach before any order is placed.
How precise do my measurements need to be when ordering replacement windows?
For standard replacement windows, dimensions should be accurate to the nearest 1/8 inch, and you should always use the smallest of your three measurements for both width and height. For custom-manufactured products including impact-resistant units, arched windows, circle windows, and specialty shapes, manufacturers require accuracy to 1/16 inch, meaning even a small rounding error can cause the unit to be manufactured to the wrong specification. Never round up your measurements. A window unit that is even 1/8 inch too wide will not seat in the opening. The manufacturing tolerance for custom windows is tight because these units are built to your exact dimensions and cannot be returned or adjusted after production. If you have any uncertainty about the precision of your self-measured dimensions, always request a professional measurement visit from a certified installer before placing an order.
Can I measure my windows myself, or should I always hire a professional?
You can measure your own windows for planning and budgeting purposes, and the guide above gives you the same methodology that professional installers use. However, professional measurement is recommended before placing a final order for custom-manufactured windows, particularly for openings that are out of square, have depth below 3 and 1/4 inches, or involve specialty shapes. DIY window installation mistakes have led to water damage costs of $2,000 to $10,000 or more according to industry data, and most manufacturers void their warranties for improperly installed windows. Raleigh Window Company provides free in-home professional measurement visits as a standard part of our quote process for all customers in the Raleigh area and surrounding Triangle communities. If you are looking for Window Services Near You that verify every dimension before a single window is ordered, reach out to us today for your no-obligation free consultation.
Measure Right, Install Right, Save Right
Window replacement is one of the most financially and practically impactful upgrades you can make to a home. The average homeowner saves between $125 and $340 per year on energy bills and recovers up to 76% of the project cost at resale. But every one of those benefits depends on one foundational step: accurate measurement of the opening before a single window is ordered.
The process is not complicated. Three width measurements, three height measurements, one depth check, a diagonal squareness verification, and a clearly labeled worksheet for every opening in your home. Invest fifteen minutes per window at the start of your project and you protect every dollar of the investment that follows.
Raleigh Window Company exists to make this process as easy and risk-free as possible for homeowners throughout Raleigh and the Triangle. Our free in-home measurement visits are handled by certified window specialists who check every dimension, document every condition, and review every measurement with you before your order is placed. There are no surprises, no restocking fees, and no waiting on a reorder because a number was wrong.
If this guide helped you understand the measurement process, share it with a friend or neighbor who is planning a window project. Drop a comment below with your biggest question about measuring windows and we will answer it directly. And when you are ready to take the next step, contact Raleigh Window Company for your free in-home measurement visit. We are the Window Company near me for Raleigh homeowners who want a professional result from the very first measurement. Reach out today and let us get your windows right.